Materials Needed:
- Sharp grafting knife 🔪
- Grafting tape or rubber bands 🩹
- Rootstock and scion wood 🌱
- Pruning shears ✂️
- Rubbing alcohol 🍶
- Grafting sealant or wax 🕯️
Step-by-Step Guide:
Choosing Rootstock and Scion
- Rootstock: Choose healthy, disease-resistant rootstock.
- Scion: Select scion wood from a productive tree, ensuring it matches the rootstock diameter and has several buds.
Timing
Best Season: Late winter or early spring before buds swell
Preparing the Tools
Sterilize Tools: Clean tools with rubbing alcohol to prevent disease
Making the Cuts
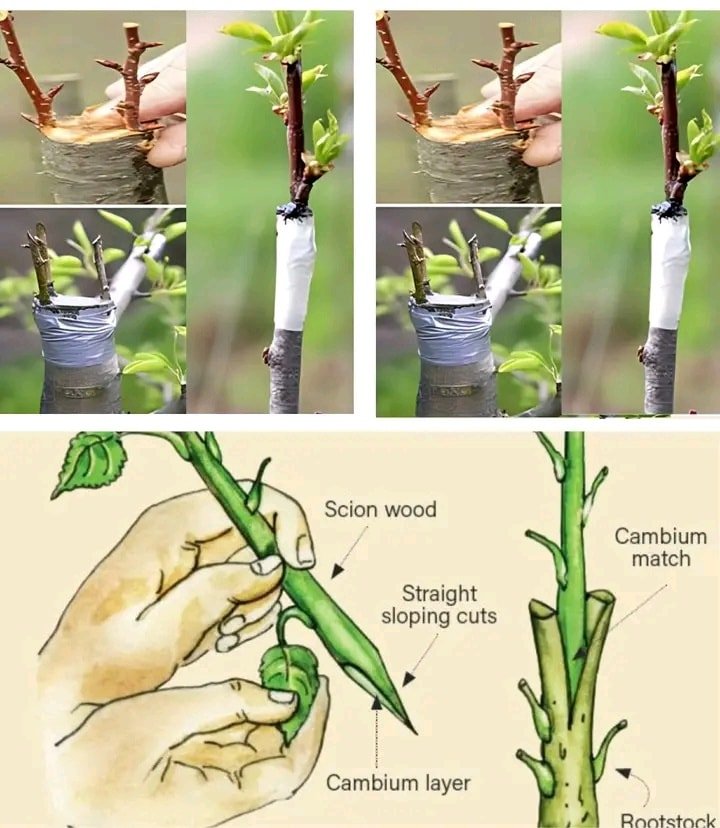
- Rootstock Cut: Make a clean cut (whip and tongue, cleft, or bark graft).
- Scion Cut: Match the scion cut to the rootstock. For whip and tongue grafts, make a diagonal cut with a small slit.
Joining Rootstock and Scion
- Align Cambium Layers: Align the green cambium layers carefully .
- Secure the Graft: Bind with grafting tape or rubber bands to ensure good contact.
Protecting the Graft
- Seal the Graft: Apply grafting sealant or wax to prevent moisture loss and disease.
- Labeling: Label the graft with the date and varieties used
Aftercare
- Watering: Keep the graft well-watered but avoid waterlogging .
- Sunlight: Place the graft in indirect sunlight to avoid stress .
- Pruning: Remove any shoots below the graft union to direct energy to the scion.
Monitoring and Maintenance
- Check the Graft: Regularly inspect for new growth and signs of failure .
- Remove Tape: Once the graft is healed, remove the tape to prevent girdling.
- Support: Provide support if necessary to protect the graft .
Tips for Success:
- Practice Makes Perfect: Grafting improves with practice. Experiment with different techniques .
- Healthy Materials: Use healthy, disease-free rootstock and scion.
- Patience: Allow time for the graft to heal and grow. Don’t be discouraged by initial failures .
- Follow these steps for successful grafting and enjoy improved fruit quality and tree performance